
07.Apr.2023
In this article, we will examine how to send control commands to a microcontroller connected to a Wifi module with the Flutter-Dart programming language. But first, let's give some examples of Wifi-based control applications:
Here are some sample applications from Wi-Fi controlled home devices:
Smart thermostats: These devices allow you to control the home's heating and cooling systems via Wi-Fi. In this way, you can remotely control the temperature of your home and save energy.
Smart lighting: These devices allow you to change your lighting patterns by controlling your home over Wi-Fi. This provides functions such as turning your lights on, off or adjusting their brightness.
Smart security cameras: These devices allow you to monitor your home remotely via Wi-Fi. This way you can use a smartphone or tablet to monitor your home from anywhere.
Smart door lock: These devices allow you to lock and unlock your home door via Wi-Fi. In this way, you can access your door remotely and let your guests in.
Smart sockets: These devices allow you to control your sockets via Wi-Fi. In this way, you can use a smartphone or tablet from anywhere to turn your sockets on or off.
These examples can be multiplied further.
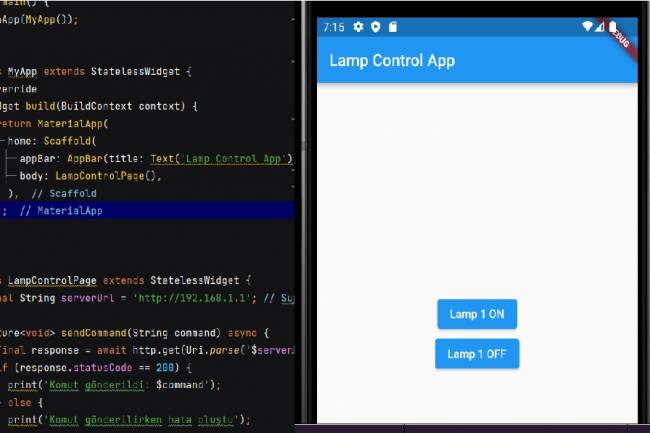
Let's examine the codes on the Flutter-Dart codes side. Let's examine the codes with a simple code without going into visual widgets. You can send HTTP GET requests to the ESP 12fWifi module using an example Flutter code as below. This code sample uses the IP address and port 80 of the ESP 12f module as the web server and sends simple commands such as on and off. Of course, commands like these "open" and "close" can be duplicated.
import 'package:http/http.dart' as http;
void main() {
turnOn(); // send data to ESP 12f
turnOff(); // send data to ESP 12f
}
void turnOn() async {
var response=await http.get('http://ESP_12f_IP_adrs:80/on');
if (response.statusCode==200) {
print('ESP 12f open');
} else {
print('Hata: ${response.statusCode}');
}
}
void turnOff() async {
var response=await http.get('http://ESP_12f_IP_adrs:80/off');
if (response.statusCode==200) {
print('ESP 12f closed');
} else {
print('Hata: ${response.statusCode}');
}
}
#include <ESP8266WiFi.h>
#include <WiFiClient.h>
const char* ssid="Wifi_SSID"; // WiFi net SSID
const char* password="Wifi_şifresi"; // WiFi password
WiFiServer server(80); // Web server port number
void setup() {
Serial.begin(9600); // Serial port için baud rate
delay(10);
// WiFi connect
WiFi.begin(ssid, password);
while (WiFi.status() !=WL_CONNECTED) {
delay(1000);
Serial.println("WiFi connecting...");
}
Serial.println("WiFi connected.");
// Web server open port
server.begin();
Serial.println("Web server started.");
}
void loop() {
// new request controlling
WiFiClient client=server.available();
if (!client) {
return;
}
// on request, arrived data
Serial.println("new request!.");
while (client.connected()) {
if (client.available()) {
String request=client.readStringUntil('\r');
Serial.println(request);
}
}
// close
client.stop();
Serial.println("closed.");
}
Creates a web server using the ESP 12f WiFi module. The Arduino board works as a web server and receives incoming requests. Requests are written to the serial port and then the connection is closed. Using this code, you can follow the requests from the ESP 12f module over the serial port.

Mobile programming Fundamentals for Control Applications
Fundamentals of mobile application development for control of electronic systems
05.04.2023

With the Flutter-Dart language, can we write an artificial intelligence program that takes a picture and lists the objects in it?
Flutter-Dart language, artificial intelligence program
06.04.2023
Writing Applications that control Electronic Devices with Flutter-Dart Programming Language
Controlling Electronic Devices remotely
06.04.2023
Developing an Application to Send Data to a Bluetooth-enabled Thermal Printer with Flutter
Mobile app developed with Flutter explains the step-by-step process of sending text to a Bluetooth-enabled thermal printer. Contains information about printer commands and Bluetooth communications
11.01.2024
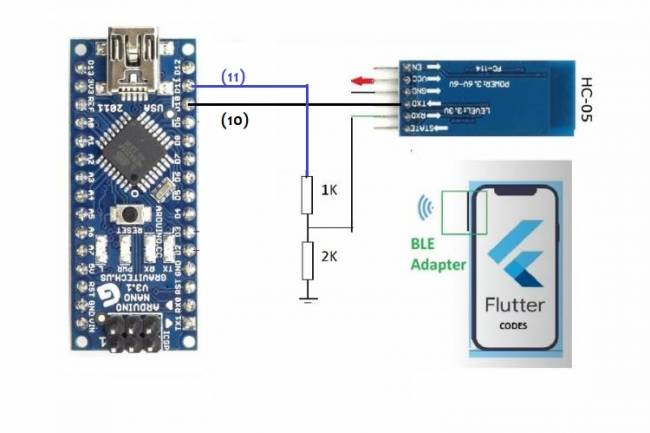
Application Development Example with Flutter and Arduino
Learn to connect mobile devices with embedded systems! In this article, learn step by step how to develop an app using Flutter and Arduino
01.03.2024
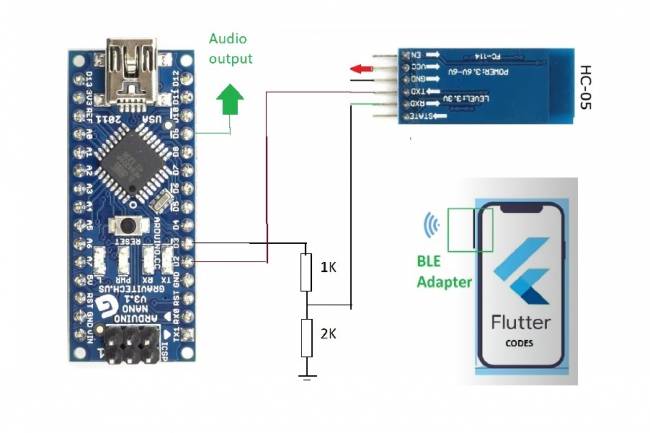
Bluetooth Speaker Project with Flutter - Audio data transfer
In this project we will try to understand how the Bluetooth speaker system is designed and how to develop it. We will examine the basics of Android programming, MCU programming-embedded system design.
24.07.2023
Extracting Data from Database and Creating Graphs with Flutter and PHP
Learn how to pull data from a database and create a line chart using Flutter and PHP
27.08.2023
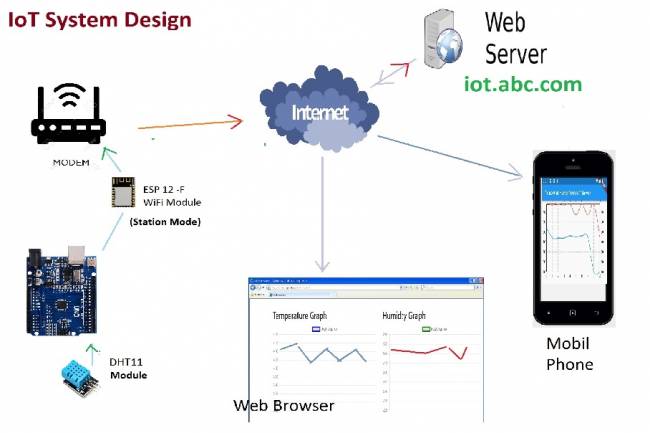
IoT System Design 1 – Temperature and Humidity Monitoring System
IoT system design with ESP 12f. Monitoring of temperature, humidity in web & mobile. Arduino, DHT11 sensor.
30.08.2023
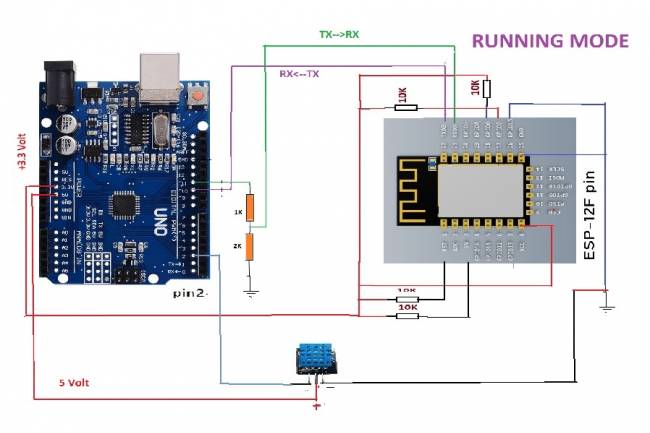
IoT System Design 2- Sending Temperature and Humidity Data to Web Server with Arduino
Learn the steps to send temperature and humidity data from DHT11 sensor with Arduino to web server via ESP 12f
30.08.2023
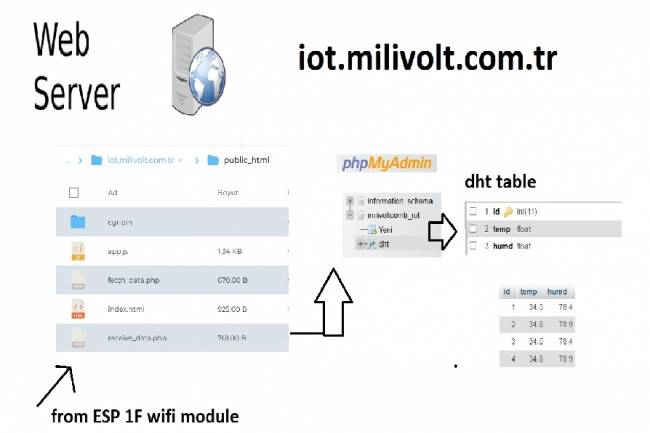
IoT System Design 3- Data Processing on the Web Server Side
Learn to transmit data from DHT11 sensor with Arduino to web server via ESP8266 and save it to database with PHP.
30.08.2023
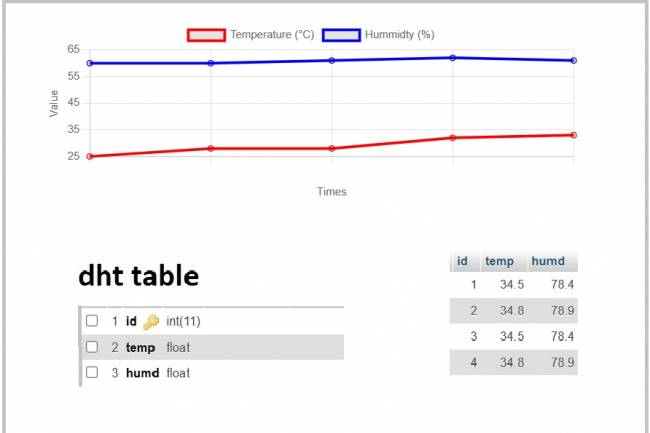
IoT System Design 4- Creating a Web Interface
Learn how data is pulled from the IoT system and used graphically.
30.08.2023
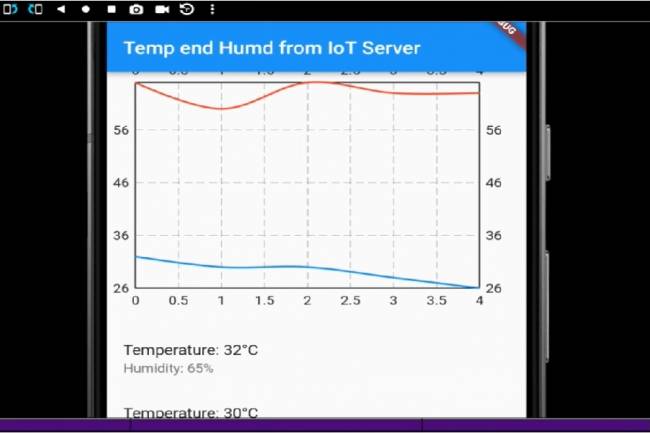
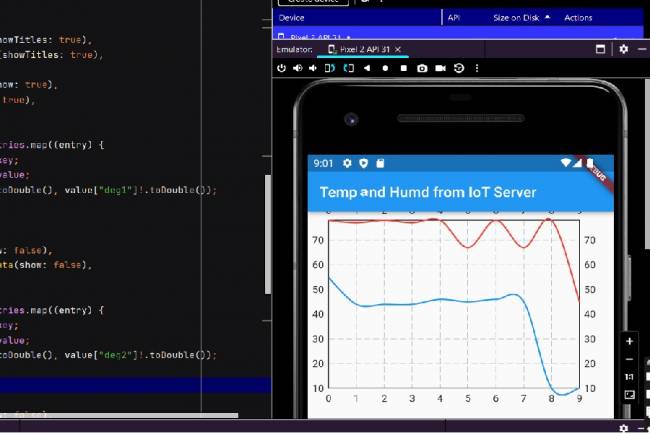
IoT System Design 5- Mobile Application Visualizing IoT Data with Flutter
Code descriptions of an application that pulls, graphs, and lists IoT data with Flutter.
30.08.2023
Mobile Application Development for Smart Homes
In this article, you can find the steps and examples of mobile application development using WiFi communication
01.09.2023
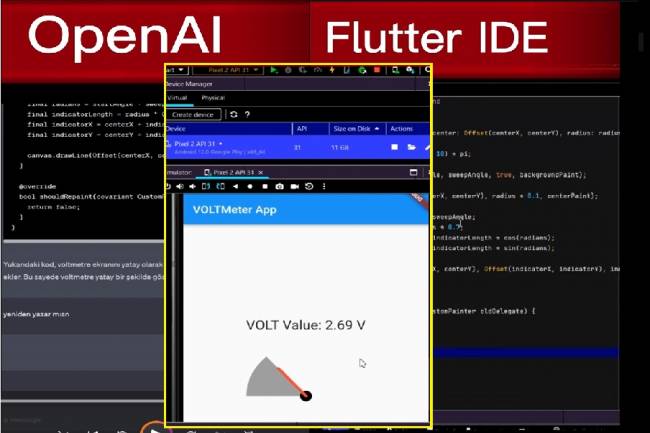
Developing Mobile Applications with Artificial Intelligence – Voltmeter Interface Application
The mobile application developed with artificial intelligence visualizes the microcontroller volt measurement with numerical data.
12.09.2023
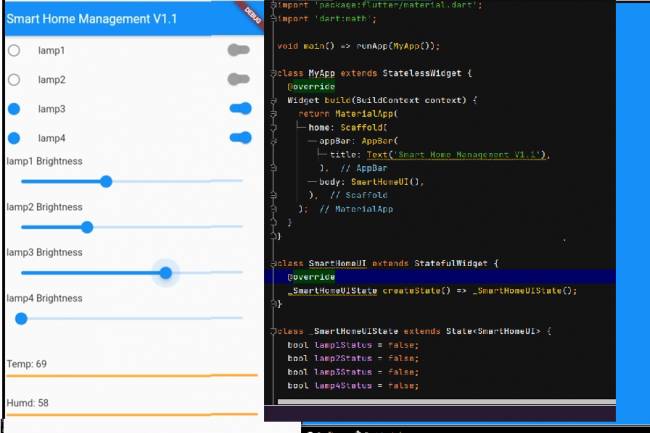
Mobile Application Interface Development Study for Smart Homes
Ways to develop mobile applications with Flutter for smart home and workplace systems
16.09.2023

Designing an Air Quality Measurement System 1 – Basic definitions of Air Quality
Air Quality Measurement System design and air quality parameters. PM2.5, CO, NO2, O3, SO2 measurement
02.10.2023
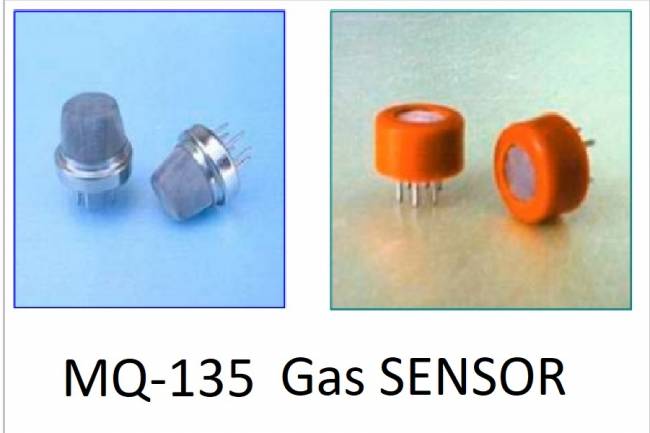
Designing an Air Quality Measurement System 2- MQ-135 Gas Sensor Review
MQ-135 Gas Sensor: A powerful sensor used to monitor air quality and detect gases. Offers precise measurement
02.10.2023
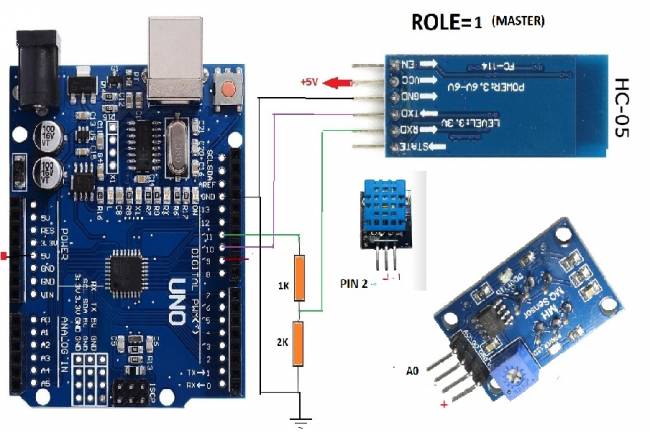
Designing an Air Quality Measurement System 3 - Measurement with MQ-135 and DHT-11
Designing an Air Quality Measurement System - Measurement with MQ-135 and DHT-11.
10.10.2023

Designing an Air Quality Measurement System 4 – Air Quality Monitoring Mobile Application
Air Quality Monitoring Mobile Application. Receive air quality data via Bluetooth, parse it in JSON format
10.10.2023