
01.Mar.2024
The integration of mobile technologies and embedded systems offers a wide range of applications. This integration can be used in industrial automation, healthcare, agriculture, smart home systems and more. In this article, we will present an example of combining technologies such as Flutter and Arduino to create a bridge between mobile devices and embedded systems.
Usage areas:
1. Industrial Automation: It can be used in factory automation and data monitoring systems to establish data communication between mobile devices and hardware. For example, monitoring and controlling the sensor data of a facility via a mobile application.
2. Smart Agriculture: In the agricultural sector, embedded systems integrated with mobile devices can be used in areas such as land monitoring, irrigation systems control, soil fertility monitoring. Mobile applications allow farmers to manage their land remotely and analyze agricultural data.
3. Health Services:Embedded systems integrated with mobile devices are widely used in areas such as data collection and monitoring with portable health devices, patient monitoring and medical imaging. Mobile applications offer users the ability to track personal health data and share it with healthcare professionals.
4. Education and Learning: Educational applications can provide interactive experiences with embedded systems. For example, it can provide children with programming and engineering skills by communicating between robotics training sets and mobile devices.
Such applications become more efficient, accessible and user-friendly thanks to the integration of embedded systems with mobile devices. In this article, we aim to demonstrate the potential of these technologies by developing a simple example usingFlutterand Arduino.
Click to read the previous related article:
ADS1115 Connection and Data Reading with Arduino Nano
First, let's update the codes in the previous MCU+ADS1115 implementation:
#include <Wire.h>
 #include <Adafruit_ADS1015.h>
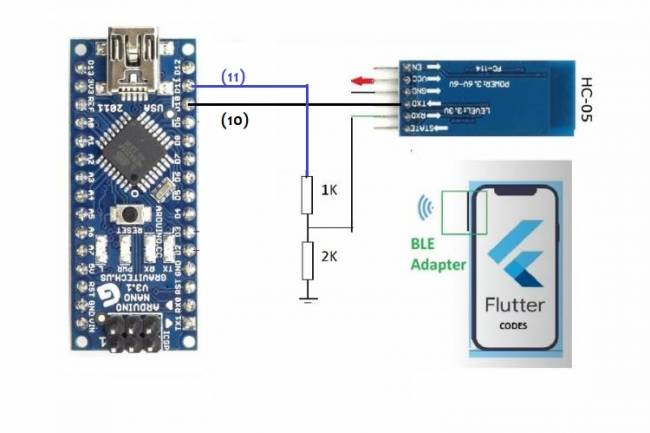
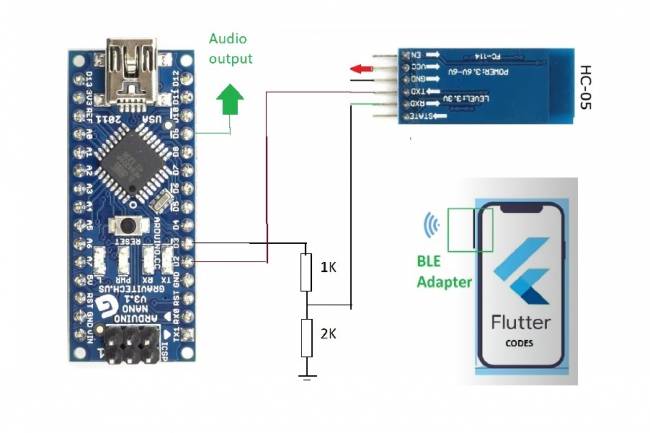
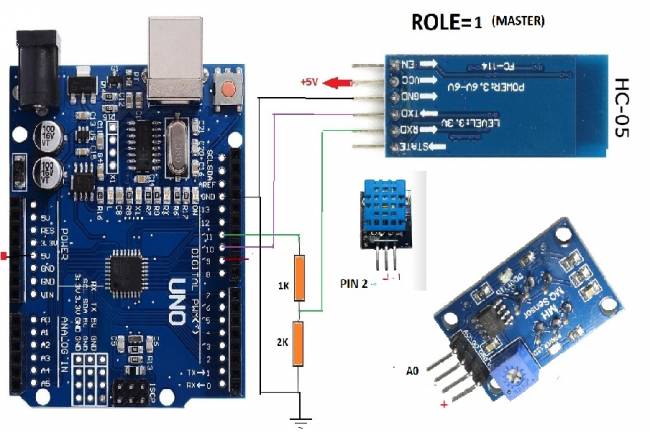
// Pins to which the Bluetooth module is connected
 #define RX_PIN 10
 #define TX_PIN 11
Adafruit_ADS1115 ads; //Create ADS1115 object
void setup(void)
 {
    Serial.begin(9600);
    Serial.println("Sample reading with ADS1115:");

    // initialize ADS1115
    if (!ads.begin())
    {
      Serial.println("Failed to initialize ADS1115!");
      while(1);
    }
   //start Bluetooth communication
    Serial1.begin(9600);
 }
void loop(void)
 {
    int16_t adc0;
   adc0=ads.readADC_SingleEnded(0); // read data from channel 0
    Serial.print("ADC 0 Value: "); Serial.println(adc0);
   // Send data via Bluetooth module
    Serial1.print("ADC 0 Value: ");
    Serial1.println(adc0);
   delay(1000);
 }
In these codes, we assumed that the RX and TX pins of the Bluetooth module are connected to pins 10 and 11 of the Arduino.
Let's add dependencies such as flutter_blue and fl_chart to the project you created. Open the pubspec.yaml file and edit it as follows:
dependencies:
    flutter:
      sdk:flutter
    flutter_blue: ^0.7.3
    fl_chart: ^0.35.0
To add the necessary permissions for Bluetooth operations, open android/app/src/main/AndroidManifest.xml and add the following permissions:
<manifest xmlns:android="http://schemas.android.com/apk/res/android"
      package="com.example.flutter_bluetooth_adc">
      <uses-permission android:name="android.permission.BLUETOOTH" />
      <uses-permission android:name="android.permission.BLUETOOTH_ADMIN" />
      <uses-permission android:name="android.permission.ACCESS_FINE_LOCATION" />
      ...
 </manifest>
We will create a service for Bluetooth operations and a widget for the line chart. Create two files named bluetooth_service.dart and line_chart.dart in the lib folder.
bluetooth_service.dart file:
import 'package:flutter_blue/flutter_blue.dart';
class BluetoothService {
    FlutterBlue flutterBlue=FlutterBlue.instance;
    BluetoothDevice _device;
    BluetoothCharacteristic _characteristic;
   Future<void> connectToBluetoothDevice() async {
      flutterBlue.scanResults.listen((results) {
        for (ScanResult result in results) {
          if (result.device.name=='YourDeviceName') { // Enter device name here
            _device=result.device;
            break;
          }
        }
      });
     await flutterBlue.startScan(timeout: Duration(seconds: 4));
      await _device.connect();
      List<BluetoothService> services=await _device.discoverServices();
      services.forEach((service) {
        service.characteristics.forEach((characteristic) {
          if (characteristic.uuid.toString()=='yourCharacteristicUUID') { // Enter feature UUID here
            _characteristic=characteristic;
          }
        });
      });
    }
   Stream<List<int>> getBluetoothDataStream() {
      return _characteristic.value;
    }
 }
line_chart.dart file:
import 'package:fl_chart/fl_chart.dart';
 import 'package:flutter/material.dart';
class LineChartWidget extends StatelessWidget {
    final List<FlSpot> spots;
LineChartWidget({this.spots});
   @override
    Widget build(BuildContext context) {
      return LineChart(
        LineChartData(
          lineBarsData: [
            LineChartBarData(
              spots: spots,
              isCurved: true,
              belowBarData: BarAreaData(show: false),
            ),
          ],
          minY:0,
          titlesData: FlTitlesData(
            leftTitles: SideTitles(showTitles: true),
            bottomTitles: SideTitles(showTitles: true),
          ),
        ),
      );
    }
 }
Finally, let's create a widget on the main application screen that will retrieve the data using this service and convert it into a line chart. Edit the main.dart file as follows:
import 'package:flutter/material.dart';
 import 'bluetooth_service.dart';
 import 'line_chart.dart';
void main() {
    runApp(MyApp());
 }
class MyApp extends StatelessWidget {
    @override
    Widget build(BuildContext context) {
      return MaterialApp(
        title: 'Bluetooth ADC',
        theme: ThemeData(
          primarySwatch: Colors.blue,
          visualDensity: VisualDensity.adaptivePlatformDensity,
        ),
        home:MyHomePage(),
      );
    }
 }
class MyHomePage extends StatefulWidget {
    @override
    _MyHomePageState createState()=> _MyHomePageState();
 }
class _MyHomePageState extends State<MyHomePage> {
    List<FlSpot> spots=[];
   @override
    void initState() {
      super.initState();
      connectToBluetoothDevice();
    }
   void connectToBluetoothDevice() async {
      BluetoothService bluetoothService=BluetoothService();
      await bluetoothService.connectToBluetoothDevice();
     bluetoothService.getBluetoothDataStream().listen((data) {
        setState(() {
          spots.add(FlSpot(spots.length.toDouble(), data.toDouble()));
        });
      });
    }
   @override
    Widget build(BuildContext context) {
      return Scaffold(
        appBar: AppBar(
          title: Text('Bluetooth ADC'),
        ),
        body: Center(
          child: LineChartWidget(spots: spots),
        ),
      );
    }
 }
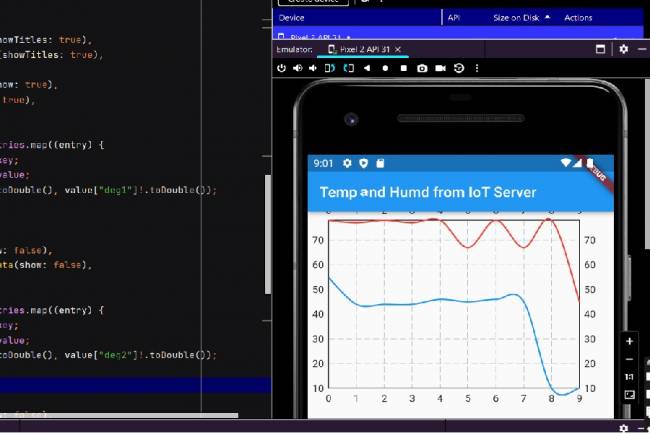
Your Flutter application will receive the data from Arduino via Bluetooth and convert it into a line graph and display it to the user.

Mobile programming Fundamentals for Control Applications
Fundamentals of mobile application development for control of electronic systems
05.04.2023

With the Flutter-Dart language, can we write an artificial intelligence program that takes a picture and lists the objects in it?
Flutter-Dart language, artificial intelligence program
06.04.2023
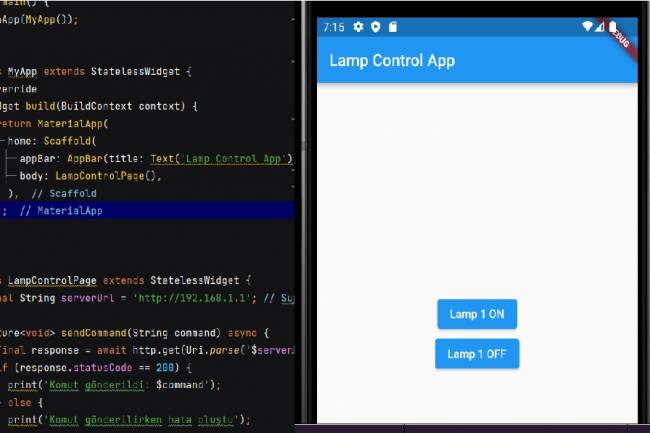
Writing Applications that control Electronic Devices with Flutter-Dart Programming Language
Controlling Electronic Devices remotely
06.04.2023
Controlling Wifi Devices with Flutter-Dart
Control of remote devices with Android apps, Wifi-based control applications
07.04.2023
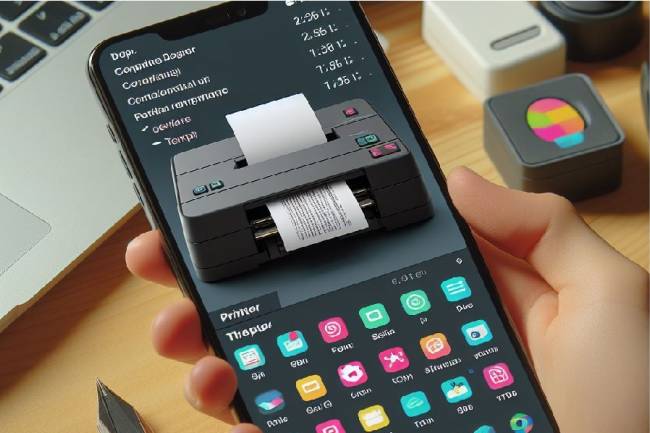
Developing an Application to Send Data to a Bluetooth-enabled Thermal Printer with Flutter
Mobile app developed with Flutter explains the step-by-step process of sending text to a Bluetooth-enabled thermal printer. Contains information about printer commands and Bluetooth communications
11.01.2024
Bluetooth Speaker Project with Flutter - Audio data transfer
In this project we will try to understand how the Bluetooth speaker system is designed and how to develop it. We will examine the basics of Android programming, MCU programming-embedded system design.
24.07.2023
Extracting Data from Database and Creating Graphs with Flutter and PHP
Learn how to pull data from a database and create a line chart using Flutter and PHP
27.08.2023
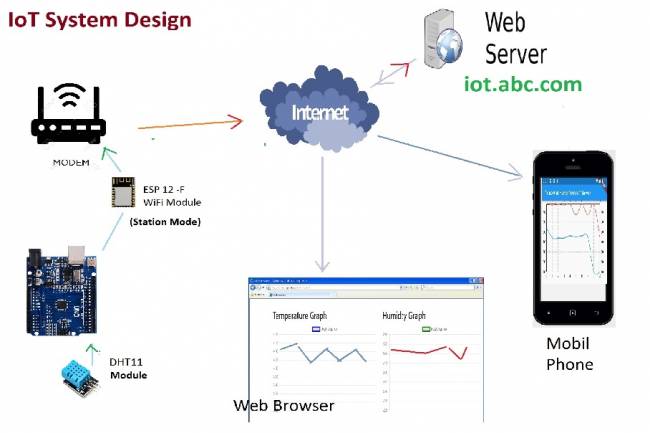
IoT System Design 1 – Temperature and Humidity Monitoring System
IoT system design with ESP 12f. Monitoring of temperature, humidity in web & mobile. Arduino, DHT11 sensor.
30.08.2023
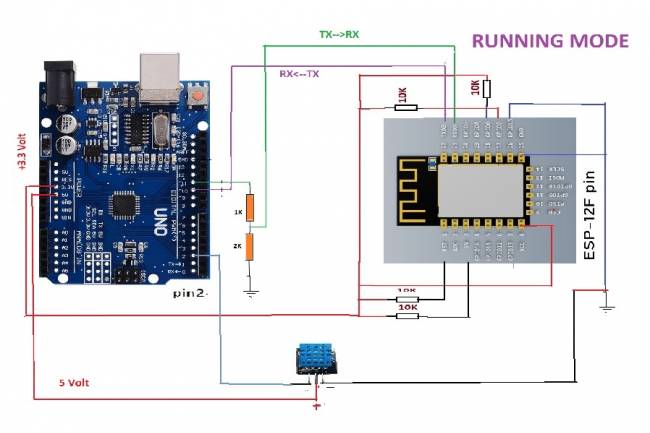
IoT System Design 2- Sending Temperature and Humidity Data to Web Server with Arduino
Learn the steps to send temperature and humidity data from DHT11 sensor with Arduino to web server via ESP 12f
30.08.2023
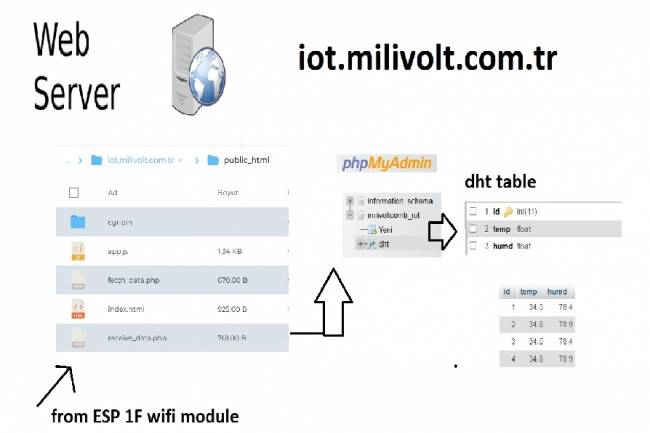
IoT System Design 3- Data Processing on the Web Server Side
Learn to transmit data from DHT11 sensor with Arduino to web server via ESP8266 and save it to database with PHP.
30.08.2023
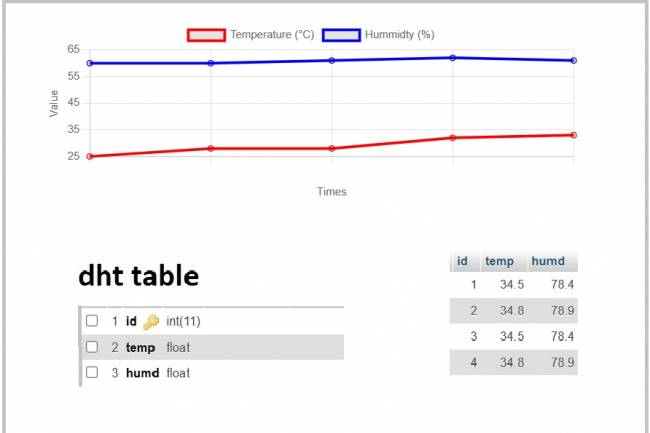
IoT System Design 4- Creating a Web Interface
Learn how data is pulled from the IoT system and used graphically.
30.08.2023
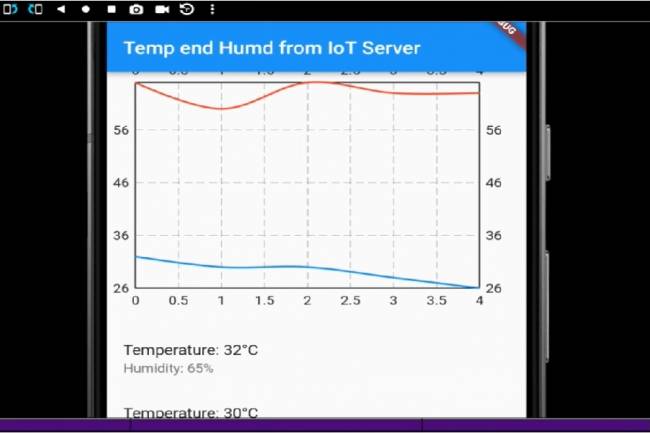
IoT System Design 5- Mobile Application Visualizing IoT Data with Flutter
Code descriptions of an application that pulls, graphs, and lists IoT data with Flutter.
30.08.2023
Mobile Application Development for Smart Homes
In this article, you can find the steps and examples of mobile application development using WiFi communication
01.09.2023
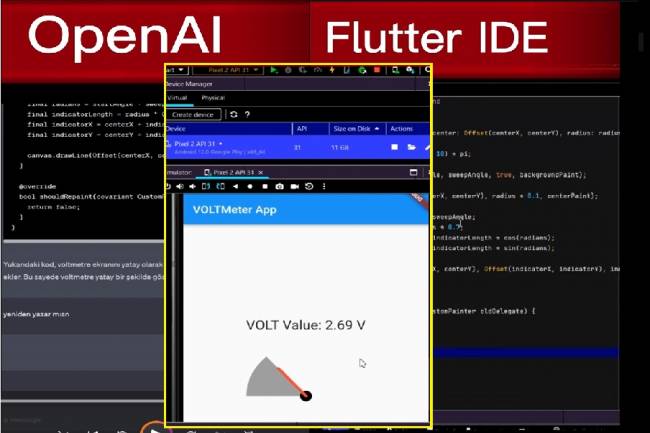
Developing Mobile Applications with Artificial Intelligence – Voltmeter Interface Application
The mobile application developed with artificial intelligence visualizes the microcontroller volt measurement with numerical data.
12.09.2023
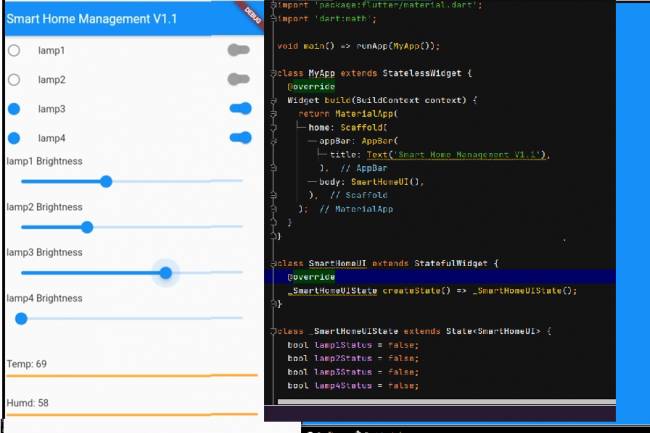
Mobile Application Interface Development Study for Smart Homes
Ways to develop mobile applications with Flutter for smart home and workplace systems
16.09.2023
Designing an Air Quality Measurement System 1 – Basic definitions of Air Quality
Air Quality Measurement System design and air quality parameters. PM2.5, CO, NO2, O3, SO2 measurement
02.10.2023
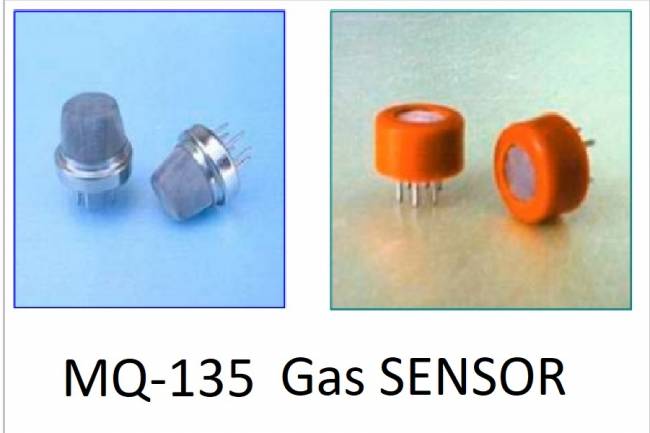
Designing an Air Quality Measurement System 2- MQ-135 Gas Sensor Review
MQ-135 Gas Sensor: A powerful sensor used to monitor air quality and detect gases. Offers precise measurement
02.10.2023
Designing an Air Quality Measurement System 3 - Measurement with MQ-135 and DHT-11
Designing an Air Quality Measurement System - Measurement with MQ-135 and DHT-11.
10.10.2023
Designing an Air Quality Measurement System 4 – Air Quality Monitoring Mobile Application
Air Quality Monitoring Mobile Application. Receive air quality data via Bluetooth, parse it in JSON format
10.10.2023